
Creating the perfect backpack for a travelling paraglider pilot is a challenge. Manufacturer’s approaches only go so far, which is why globetrotter pilots have created their own solutions. Though I don’t want to dive too much into DIY details how I created mine, I’d like to share my thoughts and experiences for some inspiration.
Let’s start with a list of what an universal pilot’s backpack should do for you:
- allow you to travel with hand luggage only and to fly without leaving anything behind
- be sturdy enough to survive tough areas
- enforce not too much compromises about flight comfort and safety
- support the idea of flying tandem
Regarding the hand luggage limitations of most airlines this means a 55x25cm pack under 8kg. It would be perfect if there was an option to piggyback a small daypack with additional gear to be more flexible in case you have “normal” baggage as well (you would need that for the tandem option anyway).
Lightweight equipment compromises on sturdiness, carrying comfort, rescue dimension and/or (xc) flight comfort. Off-the-shop gear is perfect if you hike up an alpine summit where every gram counts, but it’s usually not what you want to carry in 3rd world airports, throw into donkey carts or carry through the jungle. Sure, you can mount a strap harness, rely on a mini rescue and leave protection away, thus pressing the flight gear into a normal backpack. But what if you want your occasional flight to happen with reasonable safety, to cover some 100km, or to end with some nice wingovers?
How about modifying a tandem passenger harness? These combine a bottom protector, light weight and some storage option, though they usually lack accelerator and/or footrest which you’d have to add. Of course they support the tandem option. Unfortunately they don’t come as reversibles which would be perfect, but there is at least one exception: the Nervures Fusion (2) with reversible tandem adapter. I will come to that later.
Speaking of tandem flying I want to say something about the alternative approach which is using a light, multi purpose pilot harness with accelerator (like the Kortel Karver & Tandem module, or the Sky Country Ascet Pilot from Ukraine). The problem here is the rescue: if it’s big enough for the tandem, it is too big for the solo pilot – so you have either to carry a second front rescue in flight or to fiddle around with complicated side container. After some experiments with a solo harness which I had turned into a switchable solo/tandem hybrid I finally dropped that option again due to too many real life limitations.
The other thing is about sturdiness. High alpine regions are one thing, but hiking in hot, damp regions can be very different, especially if there’s jungle. That means that you might need tough gear, lots of water, and maybe even a machete to clear the launch – all of it easily accessible during the hike and stored away during flight.
Foldable water bottles are perfect during the hike (take care to mount them on one shoulder strap with some lightweight bottle holder), but not so good in flight. A water reservoir on the other hand works better and comes with more capacity, but you need good access to it which cuts out all the in-harness-pouches. BTW: be prepared to always carry more than one water container in case of damage!
Walking sticks are essential – holders for them on the backpack are not. If you need both hands for a brief climb you want to get rid of them as easy and quickly as possible. I find it more convenient putting them in their original bag secured with a carabiner to my belt than taking off the backpack.
If you want your pack to fit hand luggage dimensions (recommendable because of its value), you need to think about smart compression straps. External straps are useful anyway to attach clothing/gear which you need to remove at security – for security you want an easy opening and a smart internal organisation as well.
Let’s talk about the flight equipment. I want
- a “normal” glider (though I accept a single skin for trips where a flight is pretty unlikely)
- a big rescue with less than 5m/s sink rate (my 120kg rescue still weighs 1450g incl. container. Hitting the ground faster than necessary isn’t worth the saved grams)
- a seatplate option (so much more fun when freestyling over some beach, and comfy for a passenger)
- a footrest option (lightweight harnesses have a tendency to cut your legs after some hours, and it also helps getting into a proper seating position)
- accelerator leads with ball bearings (the odd rings just cost power and give way in the wrong moment)
- a solid protector under the seat (I just can’t relate to those guys who focus on safe trekking/climbing gear but are willing to glide down in a minimalist strap harness)
Clearly things become easier if you opt for a single skin glider, an alibi rescue and some straps under your bum. The good news is that, if you are creative, you can get the real thing as well – in one sturdy lightweight pack, together with basic travel stuff, and without investing into fancy super-light gear. Let me show you how I did it:
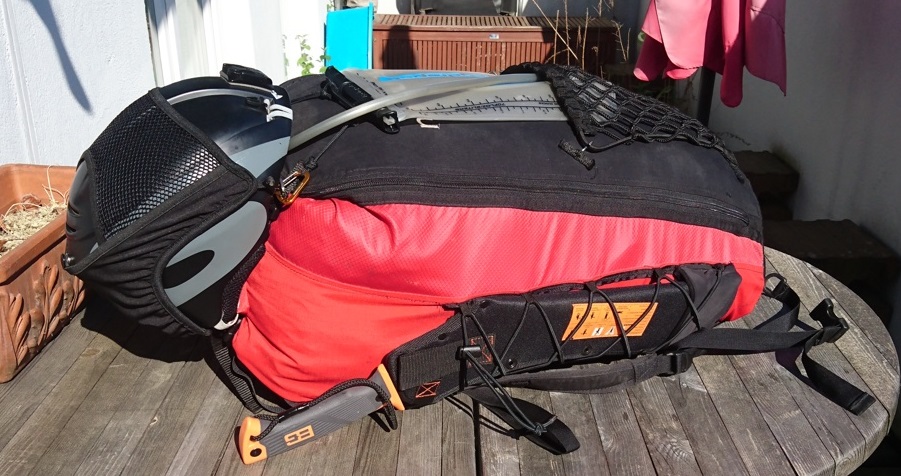
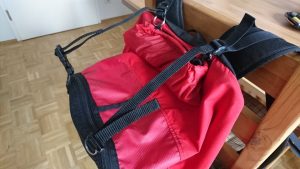
Yes, this holds a no-nonsense harness with seatplate (and even a removable pod which I change for a light accelerator for travelling), a fullsize rescue, a High-B Ozone Swift4 MS, a 2L water bladder – and it sums up to 8kg in standard hand luggage dimensions (w/o helmet which I change for a foldable one in case of serious travelling). It also serves as a comfortable passenger harness Add a hipbag with camera, batteries and documents, and you’re free to go. I have taken this one through a handful of African countries, checking out unflown areas in all shapes, flying both solo and tandem. But clearly the actual state is the result of some years of trial & error 🙂
It also bears some nice little details:
- side holder for a Parang (which you won’t get through airport security if you are really limiting yourself to hand luggage)
- back pouch for some light gear (basically additional water or a 440g lightweight fastpacker – you don’t always have time and opportunity to pack nicely)
- 2 zippers on the back, allowing you to slide the water bladder into the back pouch and use its hose in flight
- a little pouch on top to store the helmet net
- velcro on the harness shoulder straps (for the vario in passenger mode)
- and – as you see on the 1st pic – the mandatory Black Sheep Badge 🙂
(Note: that BG on the pic isn’t really good quality; consider a Condor Mini Duku instead if that’s your field)
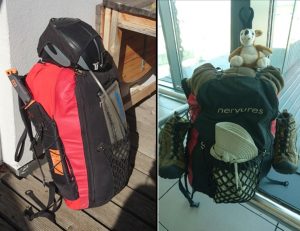
As another smart trick you can simply hang a lightweight daypack (Deuter Speed Lite 15, 380g) with additional water and bivouac equipment over the back. You only need to close the hip and breast straps for it to match solidly. This way the frontal shape doesn’t get wider (important if you make your way through dense vegetation). During flight that pack fits perfectly into the back compartment, its comfy side towards the pilot’s back.
The base of the harness is the Nervures Fusion 2, combined with the tandem passenger reversible airbag. One of its biggest advantages is the zipper connection between harness and adapter which holds the airbag in a way more stable position than some clips would. Harness and Adapter are made of solid cordura and the 1.2kg harness comes with real seat buckles, ball bearing accelerator rolls, a removable carbon seatplate and an optional footrest. In other words: for on additional pound of weight you find yourself in a totally different world compared with string harnesses (there is also a wide range of other adapters like full-size airbag, bivouac adapter, even a full-featured pod with integrated rescue for home use).
But you don’t get away without some modifications:
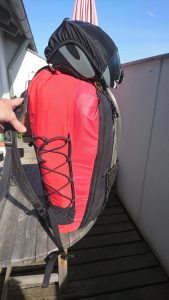
- The side net comes from an old Sky Paragliders Compression bag, its lower support is a leftover from a damaged ice climbing glove. Like I said: be creative and save money. Just remember to make it all solid: double threads and nylon enforcements are a good start.
- The back net is a cheap helmet holder from a motorbike store. I have sewed the lower edge completely to the bag to prevent things from falling out; the upper corners still use the original hooks which I’ve cut off the holder and fixed to the bag. This net also holds a water bladder: this way it is easy accesible for filling up, and in reversed mode (during flight) its hose connection doesn’t press on your back.
- The little pouch for the top helmet net has been cut off from some old inner bag material. The adjustable straps (to bring the whole thing into hand luggage dimensions) need to be sewed to the shoulder straps so that they can carry some weight.
- The original adapter comes with one single zipper which runs around the whole thing. This means that you have to open the whole thing at the airport if someone wants to look inside, also making your glider jump out. This is why I have added a second YKK 8C double zipper on the opposite side: now you can open only a little flap on top to show whatever security relevant items you might have stored inside. Other benefits are an easier closing procedure and the opening for the water hose.
Are you lured into the idea of a perfect all-in-one piece of flight gear now? Get yourself a reasonable harness plus a sewing machine and start creating yours. Begin with a future-proof checklist of what you need, design the addons, simulate hike and flight with markups of what you want to add (nothing more frustrating as having sewed a pocket you cannot reach in real life), and get going. It’s fun during longer non-flight periods, and as a result you end up with your very own, perfect “flying backpack”.